Hello all and welcome back. Today we will be bringing the big three (ISO, aperture, shutter speed) together and quickly talk about how they work together to make a proper exposure.
Proper Exposure
What is it?
Proper exposure is kind of a relative term, because different images may call for a different exposure to convey the point of the image. But generally speaking, proper exposure happens when an image is taken that allows a certain amount of light to fall upon a photographic medium that keeps highlight and shadow detail intact. What does this mean? When you shoot an image the relative goal is to take a picture that is neither too dark, nor too bright, minimizing both highlight “blowout” and shadow detail loss.
As you can see in the image above, highlight “blowout” is very obvious. This is a clear cut example of an overexposed image. You can see in the image highlight detail is lost due to the camera sensor exposed so long that all it recorded in those areas was bright white light.
While you generally want to avoid blown out images, there are times when overexposed images can be used for aesthetic reasons.
In the image above we clearly see highlight blowout, but in this image it was intentional and I feel works for the intention of the image. Sometimes it comes down to personal preference.
Underexposed
On the other hand you generally want to avoid images on the other end of the spectrum. In the image above we notice that is rather dark, which makes it difficult to see the details in the shadow areas.
Metering
In most situations it is a good practice to use your in-camera light meter to help you gauge whether or not your image will be properly exposed.
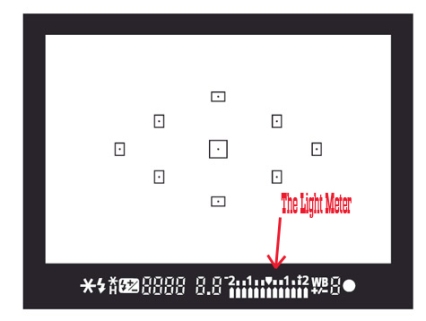
The gauge that helps you with exposure looks something like the image above. Notice the scale:
-2..1..0..1..+2
This scale is helpful in understanding the way the camera is reading the light in front of the lens. If the camera is reading too much light it will position the indicator on the positive side of the scale, if too dark towards the negative side of the indicator.
You can also find the same scale as you look through your view finder.
It should be noted that not every camera has the exact scale as seen in the above two images. My Nikon has a reversed scale:
+2…1…0…1…-2
You generally want the indicator to be positioned towards the middle of the scale, however with Photoshop and RAW processing you have quite a bit of leniency with exposure.
The Big Three
Alright, so now that we know what to avoid, but how do we get properly exposed images? Great question. Using ISO, aperture, & shutter speed.
Your first step is to meter the situation and decide if this is a situation that requires more or less light. Next you adjust you camera settings to meet the light needs of the given situation… easy right?
Okay, let’s break it down.
If a lighting situation is registering rather dark on your meter, then you will in all likelihood need to provide your camera’s sensor with more light. Now, how do you do this? If you have been following along in the 101 series, you know that each of the three settings increases, or decreases effective light (except ISO, which increases the sensitivity to available light). So to provide you camera with more light you need to change a setting(s) to increase the light flow (or sensitivity) to the sensor.
In the images below you can see how adjusting the settings can get more light to the sensor, making an under exposed image brighter.
Aperture
Shutter Speed
ISO
With each consecutive shot in the sequence we have increased the flow of (or sensitivity to) light, allowing for a more exposed image.
Remember though, with each setting change there is a resulting visual bi-product. In the case of ISO we get digital noise. With an increase in aperture we get a shallower depth of field. With a longer shutter speed we allow the chance for motion blur.
Every situation may need to be dealt with in different ways depending on the needs and what your photographing. Perhaps you are photographing a basketball game in a dark gym. If you need more light it will be more beneficial to you to open up your aperture, rather then slow down your shutter speed, which will result in motion blur in the images.
Seeking balance.
In every shot that requires you to adjust your settings remember to ask yourself, “am I loosing, or gaining light?”. When you are shooting for a proper exposure, change in one area may need to be balanced in another area.
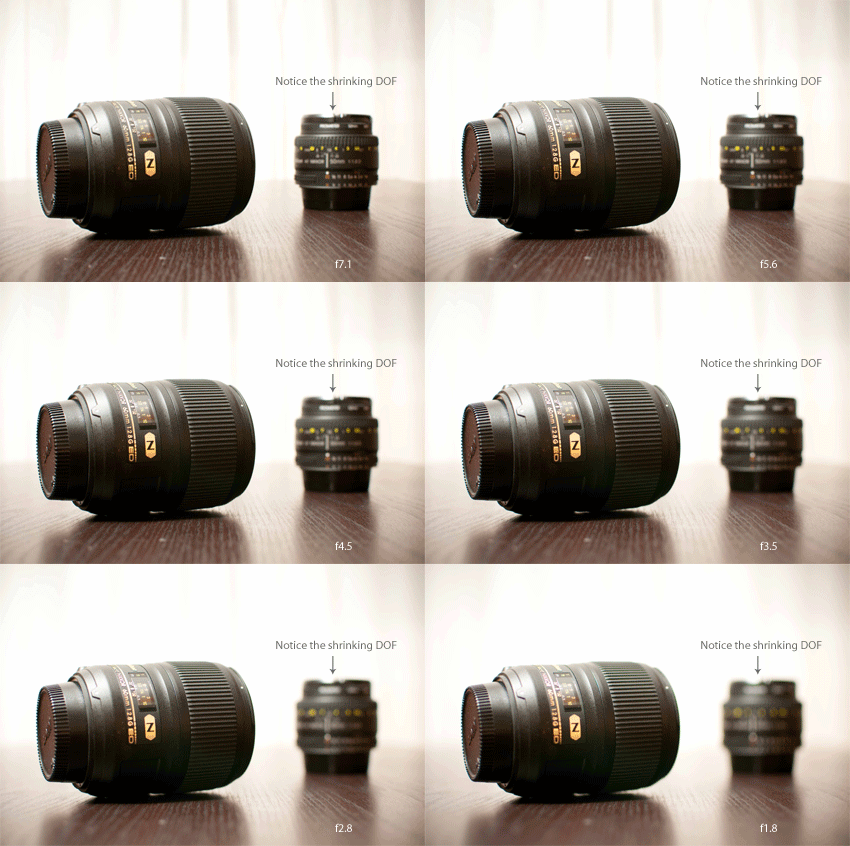
For example, if you are taking a picture of a flower and you are correctly exposed, but you want to open up your aperture to draw more attention to the subject using a shallow depth of field, you will be over exposed. To balance this you can easily speed up your shutter bringing you back to a proper exposure.
In the animation below I have shot the lenses at different apertures, but balanced the larger apertures by increasing my shutter speed each time.
Thanks for reading. Remember to meter and seek balance between the settings for proper exposures and beautiful pictures.
I hope this posts helps those of you who may have been a little confused by exposure.
Click here for previous 101 posts
Next week we will be covering the camera dial and the setting you find there, namely P,S,A,&M (or P, Tv, Av,&M for Canon users).
If you have any questions or concerns on the post, feel free to email us and we will be glad to help you. Or feel free to email us any questions you may have about photography and we will be sure to work them into another how-to post.
Email me at: will@vivalaveritas.com
Thanks!
(and comments are always appreciated!)
Louisville Wedding Photographer


